第一章 线程池Thread Pool(重要)
线程池原理
1
2
| 线程属于系统的宝贵资源,频繁的创建和销毁线程,会降低效率
所以需要使用线程池
|

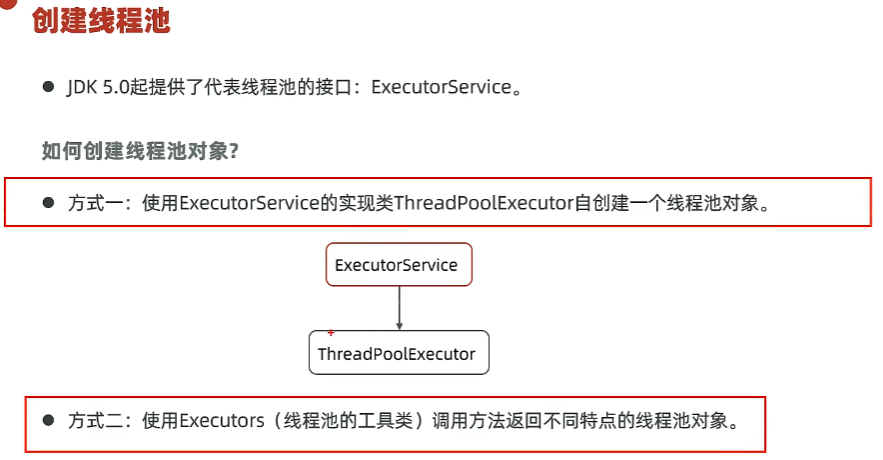
线程池
在JDK5版本中提供了代表线程池的接口ExecutorService,而这个接口下有一个实现类叫ThreadPoolExecutor类,使用ThreadPoolExecutor类就可以用来创建线程池对象。
下面是它的构造器,参数比较多,不要怕,干就完了。
1
2
3
4
5
6
7
8
9
10
11
12
13
14
15
16
17
18
19
20
21
22
| JDK中内置的线程池
java.util.concurrent.Executor接口: 与线程池相关的接口,所有线程池必须实现这个接口
抽象方法:
public abstract void execute(Runnable command):
执行方法参数指定的Runnable接口类型的任务
Executor接口规定的功能比较少,使用常用子接口:
java.util.concurrent.ExecutorService接口: 规定了线程池的很多功能
要使用ExecutorService接口中规定的方法,必然要获取到ExecutorService接口的实现类对象
实现类:
java.util.concurrent.ThreadPoolExecutor类:
可以创建对象,发现构造方法参数太多,不方便
解决方案:
使用工具类java.util.concurrent.Executors调用静态方法创建线程池对象
静态方法:
public static ExecutorService newFixedThreadPool(int nThreads)
创建一个可重用固定线程数的线程池
返回值:
ExecutorService接口: 方法内部必然返回实现类对象
|
接下来,用这7个参数的构造器来创建线程池的对象。代码如下
1
2
3
4
5
6
7
8
9
10
|
ExecutorService pool = new ThreadPoolExecutor(
3,
5,
8,
TimeUnit.SECONDS,
new ArrayBlockingQueue<>(4),
Executors.defaultThreadFactory(),
new ThreadPoolExecutor.CallerRunsPolicy()
);
|
关于线程池,我们需要注意下面的两个问题
1
| 新任务提交时,发现核心线程都在忙、任务队列满了、并且还可以创建临时线程,此时会创建临时线程。
|
1
| 核心线程和临时线程都在忙、任务队列也满了、新任务过来时才会开始拒绝任务。
|
线程池执行的任务可以有两种,
一种是Runnable任务;
一种是callable任务。
下面的execute方法可以用来执行Runnable任务。
1
2
3
4
5
6
7
8
9
10
11
12
13
14
15
16
17
18
19
20
21
22
23
24
25
26
27
28
|
public class MyPool_2 {
public static void main(String[] args) {
ThreadPoolExecutor pool = new ThreadPoolExecutor(5, 8, 1, TimeUnit.SECONDS, new ArrayBlockingQueue<>(10), Executors.defaultThreadFactory(), new ThreadPoolExecutor.DiscardOldestPolicy ());
for (int i = 1; i <= 19; i++) {
final int a = i;
pool.execute(()->{
String name = Thread.currentThread().getName();
System.out.println(name+"即将执行任务:"+a);
try {
Thread.sleep(1000);
} catch (InterruptedException e) {
throw new RuntimeException(e);
}
System.out.println(name+"执行任务完成.....................:"+a);
});
}
System.out.println(pool);
pool.shutdown();
}
}
|
执行上面的代码,结果输出如下
线程池执行Callable任务
接下来,我们学习使用线程池执行Callable任务。callable任务相对于Runnable任务来说,就是多了一个返回值。
执行Callable任务需要用到下面的submit方法
1
2
3
4
5
6
7
8
9
10
11
12
13
14
15
16
17
18
19
20
21
22
23
24
25
26
27
28
29
30
31
32
|
public class MyPool_3 {
public static void main(String[] args) throws ExecutionException, InterruptedException {
ThreadPoolExecutor pool = new ThreadPoolExecutor(2, 3, 1, TimeUnit.SECONDS, new ArrayBlockingQueue<>(6), Executors.defaultThreadFactory(), new ThreadPoolExecutor.DiscardOldestPolicy ());
for (int i = 1; i <= 10; i++) {
final int a = i;
Future f= pool.submit(()->{
String name = Thread.currentThread().getName();
System.out.println(name+"即将执行任务:"+a);
try {
Thread.sleep(300);
} catch (InterruptedException e) {
throw new RuntimeException(e);
}
System.out.println(name+"执行任务完成.....................:"+a);
return a*2;
});
}
System.out.println(pool);
pool.shutdown();
}
}
|
执行后,结果如下图所示
线程池工具类(Executors)
Java为开发者提供了一个创建线程池的工具类,叫做Executors,它提供了方法可以创建各种不能特点的线程池。如下图所示
接下来,我们演示一下创建固定线程数量的线程池。
1
2
3
4
5
6
7
8
9
10
11
12
13
14
15
16
17
18
19
20
| public class ThreadPoolTest3 {
public static void main(String[] args) throws Exception {
ExecutorService pool = Executors.newFixedThreadPool(17);
Future<String> f1 = pool.submit(new MyCallable(100));
Future<String> f2 = pool.submit(new MyCallable(200));
Future<String> f3 = pool.submit(new MyCallable(300));
Future<String> f4 = pool.submit(new MyCallable(400));
System.out.println(f1.get());
System.out.println(f2.get());
System.out.println(f3.get());
System.out.println(f4.get());
}
}
|
Executors创建线程池这么好用,为什么不推荐同学们使用呢?
原因在这里:看下图,这是《阿里巴巴Java开发手册》提供的强制规范要求。
第一章 设计模式
1.1 概念
1
2
3
4
5
6
7
8
9
10
11
| 设计模式(Design pattern),是一套被反复使用、经过分类编目的、代码设计经验的总结,使用设计模式是为了可重用代码、保证代码可靠性、程序的重用性。
1995 年,GoF(Gang of Four,四人组)合作出版了《设计模式:可复用面向对象软件的基础》一书,共收录了 23 种设计模式。
总体来说设计模式分为三大类:
创建型模式,共五种:工厂方法模式、抽象工厂模式、单例模式、建造者模式、原型模式。-->创建对象
结构型模式,共七种:[适配器模式]、装饰器模式、代理模式、外观模式、桥接模式、组合模式、享元模式。-->对功能进行增强
行为型模式,共十一种:策略模式、模板方法模式、[观察者模式]、迭代子模式、责任链模式、命令模式、备忘录模式、状态模式、访问者模式、[中介者模式]、解释器模式。
|
1.2 单例设计模式
1
2
| 单例模式
目的:保证一个类只能new一个对象出来,给外界使用
|
1.2.1 饿汉式
1
2
| 饿汉式:迫不及待的想使用对象
为了达到目的:类一加载到内存,先加载静态成员,我们只需要new对象的时候将其变成static的就可以了
|
1
2
3
4
5
6
7
8
9
10
11
12
13
14
15
16
17
| public class A {
private A(){
if(a != null){
throw new RuntimeException("不能创建多个对象...");
}
}
private static final A a = new A();
public static A getInstance(){
return a;
}
}
|
1
2
3
4
5
6
7
8
9
10
11
12
13
14
15
| public class TestA {
public static void main(String[] args) {
Runnable r = ()->{
String name = Thread.currentThread().getName();
for (int i = 0; i < 3; i++) {
System.out.println(name+"获取的A="+A.getInstance());
}
};
for (int i = 0; i < 10; i++) {
new Thread(r).start();
}
}
}
|
1.2.2 懒汉式
1
2
3
4
5
6
7
| 懒汉式:先不要new对象,什么时候使用,什么时候再new,但是还得保证只能是一个对象
问题:线程安全问题
一条线程进了if,第二条线程也可能进if,这样由于两个线程都进了if,那么在执行就会出现new两次对象的情况
解决:
上锁
|
1
2
3
4
5
6
7
8
9
10
11
12
13
14
15
16
17
18
19
20
21
22
23
24
25
| public class B {
private B(){
if(a != null){
throw new RuntimeException("不能创建多个对象...");
}
}
private static volatile B a;
public static B getInstance(){
if(a == null){
synchronized (B.class){
if(a == null){
a= new B();
}
}
}
return a;
}
}
|
1
2
3
4
5
6
7
8
9
10
11
12
13
14
15
| public class TestB {
public static void main(String[] args) {
Runnable r = ()->{
String name = Thread.currentThread().getName();
for (int i = 0; i < 3; i++) {
System.out.println(name+"获取的B="+ B.getInstance());
}
};
for (int i = 0; i < 10; i++) {
new Thread(r).start();
}
}
}
|
1
2
3
4
5
| 单例模式可以保证系统中一个类只有一个对象产生
实现单例模式的步骤:
1.将构造私有化,使其不能再类的外部通过new关键字创建对象
2.在该类内部产生一个唯一的对象,并且将其封装为private static 类型的成员变量
3.定义一个静态方法返回这个唯一的对象
|
1.2.3 volatile
练习 volatile 关键字的特点
1: 在多线程的情况下,保证数据可见
2: 防止jvm对代码进行指令重排
i++
不是原子性操作
1
2
3
4
5
6
7
8
9
10
11
12
13
14
15
16
17
18
19
20
21
|
public class Account {
private volatile int money = 1000;
public void show(){
String name = Thread.currentThread().getName();
while (true){
if(money != 1000){
System.out.println(name+"发现余额改变了........"+money);
break;
}
}
}
public void setMoney(){
String name = Thread.currentThread().getName();
money = 100;
System.out.println(name+"对账户进行了修改...修改后余额为:"+money);
}
}
|
1
2
3
4
5
6
7
8
9
10
11
12
13
14
15
16
17
|
public class Account2 {
private volatile int i;
public void inrc(){
i++;
}
public void show(){
System.out.println(i);
}
}
|
1
2
3
4
5
6
7
8
9
10
11
12
13
14
15
16
17
18
19
20
21
22
23
24
25
26
27
28
|
public class Test01 {
public static void main(String[] args) {
Account a = new Account();
new Thread(()->a.show(),"张三").start();
new Thread(()->{
System.out.println("李四准备休眠...");
try {
Thread.sleep(1000);
} catch (InterruptedException e) {
throw new RuntimeException(e);
}
a.setMoney();
},"李四").start();
}
}
|
1
2
3
4
5
6
7
8
9
10
11
12
13
14
15
16
17
18
19
20
21
22
23
24
25
26
|
public class Test02 {
public static void main(String[] args) throws InterruptedException {
Account2 a = new Account2();
for (int i = 0; i < 100; i++) {
new Thread(()->{
for (int j = 0; j < 10000; j++) {
a.inrc();
}
}).start();
}
Thread.sleep(3000);
a.show();
}
}
|
1.2.4 枚举
1
2
3
4
5
6
7
8
9
10
11
12
13
14
15
16
| public class A {
private A(){
if(a != null){
throw new RuntimeException("不能创建多个对象...");
}
}
private static final A a = new A();
public static A getInstance(){
return a;
}
}
|
1
2
3
4
5
6
7
| public enum C {
MyC;
public void abc(){
System.out.println("abc执行了...");
}
}
|
1
2
3
4
5
6
7
8
9
10
11
| public class TestA {
public static void main(String[] args) throws NoSuchMethodException, InvocationTargetException, InstantiationException, IllegalAccessException {
Class<A> aClass = A.class;
Constructor<A> constructor = aClass.getDeclaredConstructor();
constructor.setAccessible(true);
A a = constructor.newInstance();
System.out.println(a);
System.out.println(A.getInstance());
}
}
|
1
2
3
4
5
6
7
8
9
10
11
12
13
14
15
16
17
18
19
20
| public class TestC {
public static void main(String[] args) throws NoSuchMethodException, InvocationTargetException, InstantiationException, IllegalAccessException {
for (int i = 0; i < 10; i++) {
new Thread(()->{
String name = Thread.currentThread().getName();
for (int i1 = 1; i1 <= 10; i1++) {
System.out.println(name+"第"+i1+"次获取对象的哈希值是:"+C.MyC.hashCode());
}
}).start();
}
Class<C> cClass = C.class;
Constructor<C> constructor = cClass.getDeclaredConstructor();
C c = constructor.newInstance();
System.out.println(c);
}
}
|
1.3 工厂设计模式
1.3.1 什么是工厂设计模式
1
2
| 1.之前我们创建类对象时, 都是使用new对象的形式创建,在很多业务场景下也提供了不直接new的方式 。
2.工厂模式(Factory Pattern)是Java中最常用的设计模式之一,这种类型的设计模式属于创建型模式,它提供了一种获取对象的方式。
|
1.3.2 工厂设计模式的作用
1
2
| 工厂的方法可以封装对象的创建细节,比如:为该对象进行加工和数据注入。
可以实现类与类之间的解耦操作(核心思想)。
|
1.3.3 案例
1
2
3
4
5
6
7
8
9
10
11
|
public abstract class Car {
private String brand;
private String color;
private int price;
public abstract void run();
}
|
1
2
3
4
5
6
7
|
public class AudiCar extends Car {
@Override
public void run() {
System.out.println(getBrand() + "::" + getColor() + "::" + getPrice() + "....奥迪车...正在冒着狼烟的跑....");
}
}
|
1
2
3
4
5
6
7
|
public class BmwCar extends Car {
@Override
public void run() {
System.out.println(getBrand() + "::" + getColor() + "::" + getPrice() + "....宝马车...正在疯狂的跑....");
}
}
|
1
2
3
4
5
6
7
8
9
10
11
12
13
14
15
16
17
18
19
20
21
22
|
public class CarFactory {
public static Car createCar(String msg) {
switch (msg){
case "bmw":
Car car = new BmwCar();
car.setBrand("BMW750Li");
car.setColor("宝强绿");
car.setPrice(999999);
return car;
case "audi":
Car car2 = new AudiCar();
car2.setBrand("奥迪A8L");
car2.setColor("骚红");
car2.setPrice(888888);
return car2;
default:
return null;
}
}
}
|
1
2
3
4
5
6
7
8
9
10
11
12
13
14
15
16
17
18
19
20
21
22
23
24
25
26
27
28
29
30
31
32
33
34
35
|
public class DemoFactory {
public static void main(String[] args) {
Car car = CarFactory.createCar("bmw");
car.run();
Car car2 = CarFactory.createCar("audi");
car2.run();
}
}
|